 Note
Note
| Removal and installation are described only for the left side.
Removal and installation of the right side are similar. |
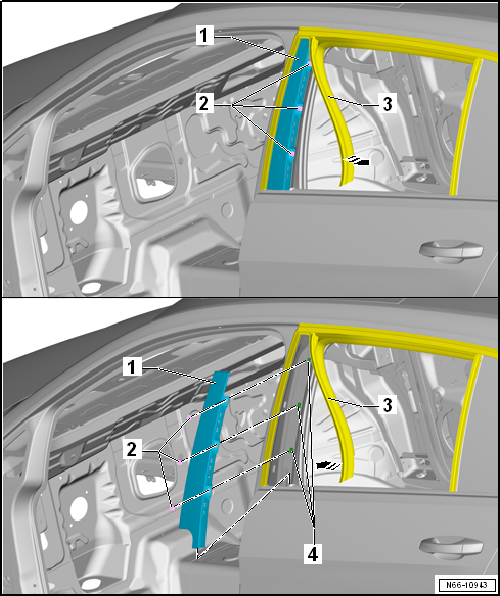
| – |
Run door window down to bottom position. |
| – |
Pull window channel -3- in area of
B-pillar trim-1- out of door frame. |
| – |
Unclip spreader rivets -2-. |
| – |
Push B-pillar trim -1- downwards and
pull off door frame. |
| – |
Pull out B-pillar trim -1- upwards. |
| – |
Insert B-pillar trim -1- on door frame. |
| – |
Fit B-pillar trim -1- in longitudinal
holes -4- in frame section. |
| – |
Position B-pillar trim -1- and push
until stop. |
| – |
Push B-pillar trim -1- upwards until it
is in contact with window channel -3-. |
| – |
Hook in spreader rivet -2- from top to
bottom and insert window channel -3- into
B-pillar trim. |
Questions & answers
Removing and installing B-pillar trim on rear door — Volkswagen Golf Mk7
How do I remove the Golf Mk7 B-pillar trim on the rear door?
Run the rear window up, release the clips and remove the trim. Same procedure as the front door B-pillar trim, mirrored for each side.
Note
Removal and installation are described only for the left side.
Removal and installation of the right side are similar.
Removing
–
...
Note
The removal and installation procedures may have to be modified
slightly depending on engine fitted.
Removing
–
Removing centre u ...


