 Note Note
| There are different designs and makes of heater and air
conditioning unit. The individual components of the various
heaters and air conditioning units are similar but not identical
(distinguishing features
→ Chapter). The combined fitting of different makes
of component is therefore not permissible
→ Electronic Parts Catalogue. |
|
|
|
| – |
Remove heater and air conditioner unit
→ Chapter. |
| – |
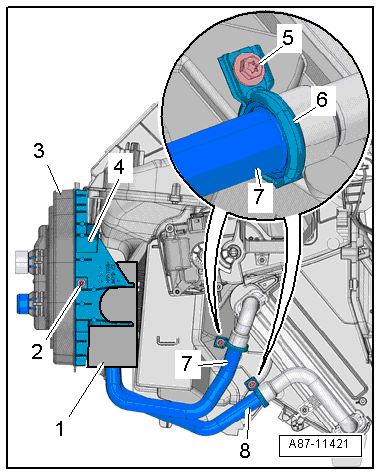
Detach the sealing collar -3-
to the plenum chamber bulkhead. |
| – |
Detach the coolant pipe holder -4-
to the left. |
| – |
Screw out the bolts -5- and
detach the screw-type clamps -6-. |
| – |
Pull coolant pipes -7- and
-8- off heat exchanger. |
|
|
|
| Installation is carried out in the reverse order. When
installing, note the following: |
| – |
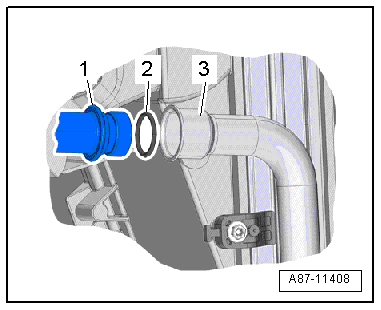
Check connection -3- of the
heat exchanger and the connection of the coolant pipes
-1- for damage or dirt. |
| – |
Clean and smoothen sealing surface for seals. |
| – |
Moisten new seals -2- with
coolant (or lubricate lightly with silicone grease) and fit them
to coolant pipe -1-. |
| – |
Push coolant pipes into heat exchanger as far as stop. |
Risk of malfunction on heat exchanger due to defective seals and
leaks.Never squeeze seals.Never cant coolant pipes.Slide on coolant
pipes completely. |
|
|
| – |
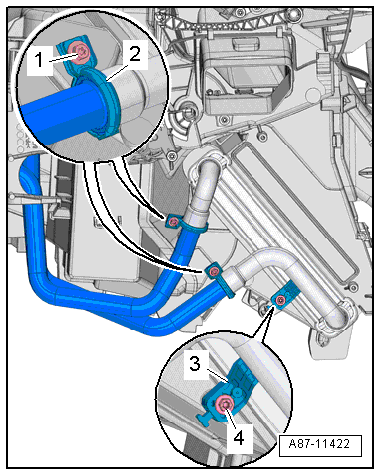
Fit new screw-type clamps -2-
at the coolant pipe/heat exchanger joint. |
| – |
Check screw-type clips -2- for
proper seating on connections of heat exchanger and check
coolant pipes. The coolant pipes must not rest against air
distribution housing or any other components. |
| – |
Install heater and air conditioning unit
→ Chapter. |
| – |
Read event memory, and clear any entries displayed vehicle
diagnostic tester in “Guided fault finding” mode. |
| – |
As a final step, check operation of heater and air
conditioning system. |
| → Chapter „Assembly overview - heater and air conditioning unit“ |
|
|
|
Questions & answers
Removing and installing coolant pipes at heat exchanger (Denso) — Volkswagen Golf Mk7
How do I remove the Golf Mk7 Denso heat exchanger coolant pipes?
Same principle as Valeo. Different pipe routing and connection types. Drain coolant first.
Note
There are different designs and makes of heater and air
conditioning unit. The individual components of the various
heaters and air conditioning u ...
Special tools and workshop equipment
required
Removal wedge -3409-
Note
...


