| Seat pan, standard seat, seat of type "ergo Aktiv" |
 Note
Note
-
| |
The illustration shows the driver seat pan. The front
passenger seat pan is similar (mirror image of driver seat pan). |
-
| |
The illustration shows the seat pan for LHD vehicles. The
seat pan for RHD vehicles is similar (mirror image of seat pan for
LHD vehicles). |
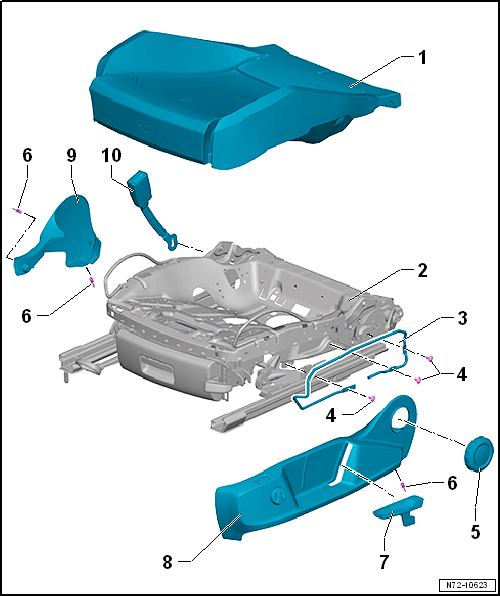
- Removing and installing cover and padding on seat pan
→ Chapter
- Separating seat pan cover from seat pan padding
→ Chapter
Depending on vehicle equipment, with:
- Seat rake adjustment
→ Anchor
- Seat depth adjustment
→ Anchor
- Seat height adjustment
→ Anchor.
- Storage compartment
→ Anchor
- For seat trim on sill side
- Configuration depends on vehicle equipment
- Removing and installing
→ Chapter
- For manual backrest adjustment
- On vehicles with front passenger seat with through-loading function, the
adjustment and release lever is fitted instead of the adjustment knob
- Depends on equipmen
- Removing and installing
→ Chapter
- For seat height adjustment
→ Anchor
- Removing and installing
→ Chapter
- Sill side
- Configuration depends on vehicle equipment
- Removing and installing
→ Chapter
- Tunnel side
- Removing and installing
→ Chapter
- Removing and installing
→ Chapter
| Seat pan, electrically adjustable seat |
Note
| |
The illustration shows the driver seat pan. The front passenger seat
pan is similar (mirror image of driver seat pan). |
| |
The illustration shows the seat pan for LHD vehicles. The seat pan
for RHD vehicles is similar (mirror image of seat pan for LHD vehicles). |
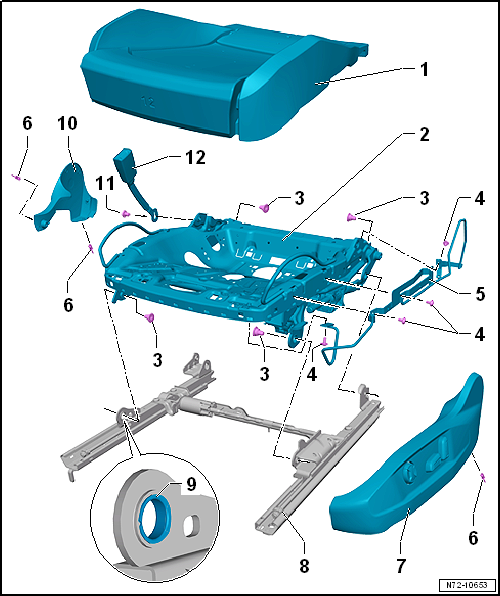
- Separating seat pan cover from seat pan padding
→ Chapter
- Removing and installing cover and padding on seat pan
→ Chapter
- Qty. 4
- Self-locking
- Renew after removal
- Clean threaded holes for bolts with, for example, a thread tap
- 22 Nm
- For seat trim on sill side
- Removing and installing
→ Chapter
- Sill side
- Removing and installing
→ Chapter
| 8 - |
Lower frame of seat pan |
- Driver seat longitudinal adjustment motor -V28-
- Front passenger seat longitudinal adjustment motor -V31-
- Cannot be disassembled
- Removing and installing
→ Chapter
- When renewing, fit belt buckle in new lower frame
- Inserted in all bearing points
- Cannot be renewed using workshop equipment
- If bush is damaged, renew lower seat pan frame
- Tunnel side
- Removing and installing
→ Chapter
| |
Removing and installing
→ Chapter |
| Seat height adjustment, standard seat, seat of type "ergo Aktiv" |
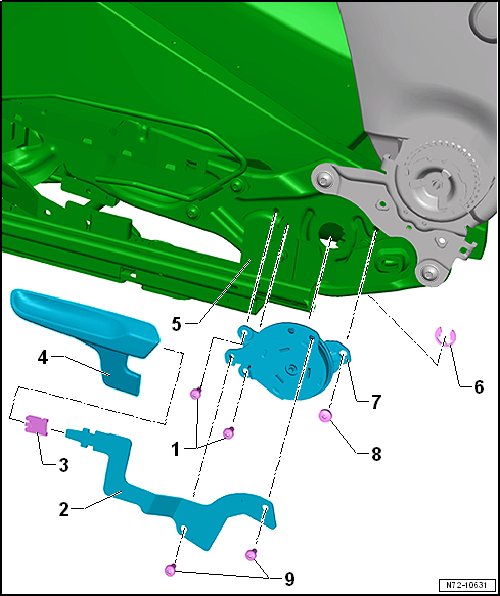
- Qty. 2
- Note different length compared to bolt -item 8-
- 6.5 Nm
| 2 - |
Seat height adjustment lever |
- For seat height adjustment
- Removing and installing
→ Chapter
| 4 - |
Handle for seat height adjustment |
- Removing and installing
→ Chapter
- Assembly overview → Chapter
- Removing and installing
→ Chapter
- Note different length compared to bolts -item 1-
- 10 Nm
| Seat height adjustment, electrically adjustable seat |
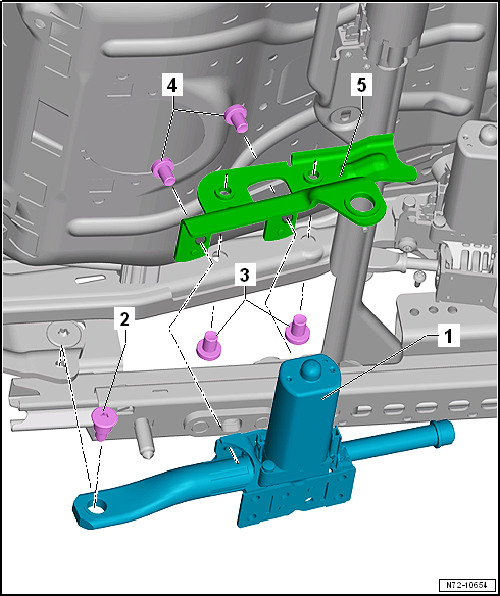
| 1 - |
Seat height adjustment motor |
- Driver seat height adjustment motor -V138-
- Front passenger seat height adjustment motor -V246
- Removing and installing
→ Chapter
 Caution Caution
|
- Self-locking
- Renew after removal
- Observe notes when removing and installing
→ Chapter
- Clean threaded hole for bolt with, for example, a thread tap
- 22 Nm
- Qty. 2
- Self-locking
- Renew after removal
- Clean threaded holes for bolts with, for example, a thread tap
- 20 Nm
- Qty. 2
- Self-locking
- Renew after removal
- Clean threaded holes for bolts with, for example, a thread tap
- 10 Nm
| Seat rake adjustment, standard seat, seat of type "ergo Aktiv" |
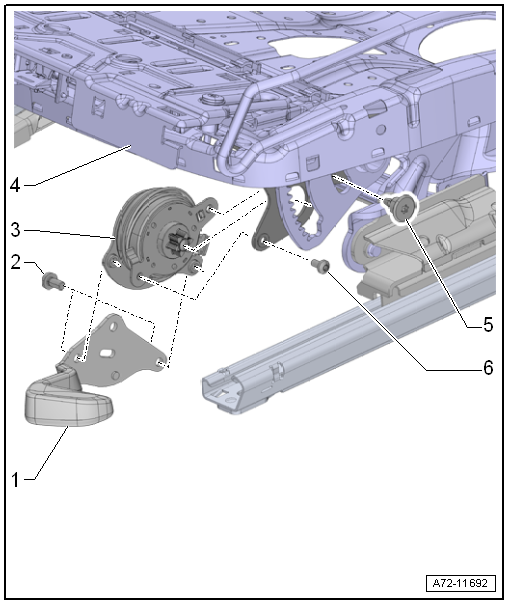
- For seat rake adjustment
- Removing and installing
→ Chapter
- Removing and installing
→ Chapter
Caution
|
- Self-locking
- Renew after removal
- Clean threaded hole for step bolt with, for example, a thread tap
- 6 Nm
- Self-locking
- Renew after removal
- Clean threaded holes for bolts with, for example, a thread tap
- 6.5 Nm
| Seat rake adjustment, electrically adjustable seat |
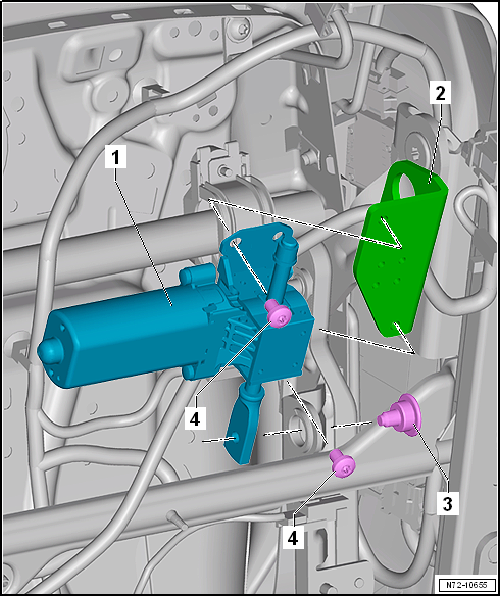
| 1 - |
Seat rake adjustment motor |
- Driver seat rake adjustment motor -V243-
- Front passenger seat rake adjustment motor -V244-
- Removing and installing
→ Chapter
- Self-locking
- Renew after removal
- Clean threaded hole for bolt with, for example, a thread tap
- 20 Nm
- Qty. 2
- Self-locking
- Renew after removal
- Clean threaded holes for bolts with, for example, a thread tap.
- 10 Nm
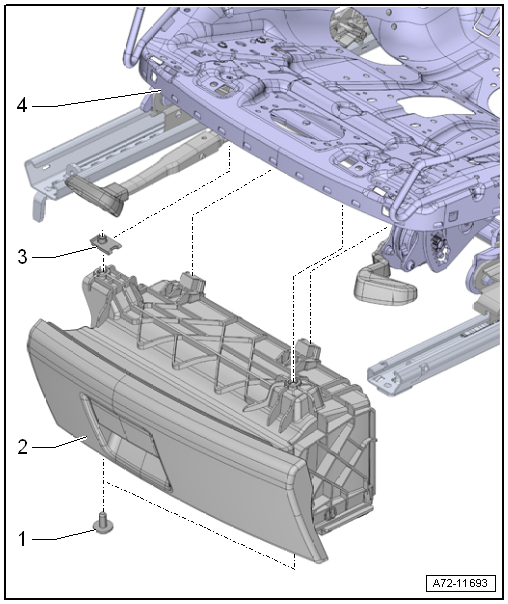
- Depends on equipment
- Removing and installing
→ Chapter
- Cannot be disassembled
- Allocation
→ Electronic Parts Catalogue
- Qty. 2
- Inserted into seat pan.
- Renew any damaged or deformed speed nuts.
- Seat pan
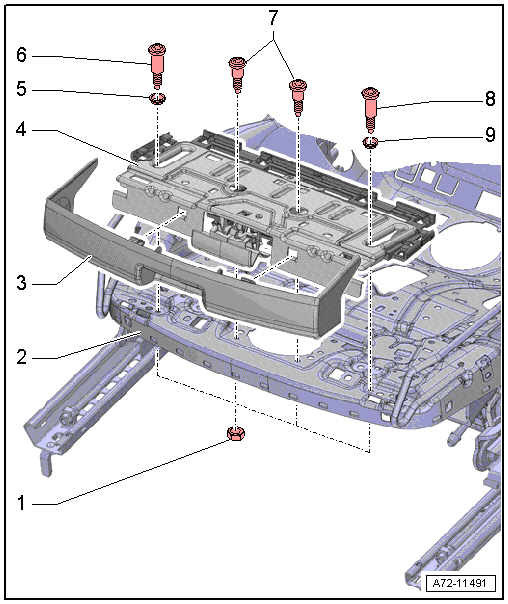
- Qty. 4
- Renew after removal
- With seat depth adjustment
- For seat depth adjustment
- Removing and installing
→ Chapter „Removing and installing seat depth adjustment“
- Press in until it audibly engages
| 4 - |
Seat depth adjustment |
- Removing and installing
→ Chapter
- Renew after removal
- Fit bolt with locking fluid; locking fluid
→ Electronic Parts Catalogue
- 4 Nm
- Renew after removal
- Fit bolt with locking fluid; locking fluid
→ Electronic Parts Catalogue.
- 4 Nm
- Renew after removal
- Fit bolt with locking fluid; locking fluid
→ Electronic Parts Catalogue
- 4 Nm
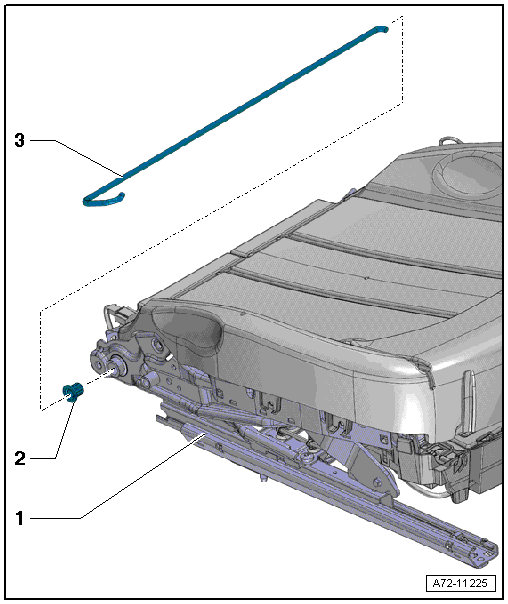
- For torsion rod
- Fitted into guide
- Greased; Grease
→ Electronic Parts Catalogue
Questions & answers
Assembly overview - seat pan — Volkswagen Golf Mk7
What does the Golf Mk7 seat pan assembly show?
Seat pan frame, height adjustment mechanism, fore/aft rails, torsion rod, depth adjustment and cover attachment. Driver shown; passenger similar.
Front backrest, standard seat, seat of type "ergo Aktiv"
Note
The illustration shows the driver seat backrest. The front
passenger seat backrest is simila ...
1 -
Bracket
Removing
–
Remove bracket -4-.
–
Remove seat cover and padding from seat pan
→ Chapter.
...


