 Note
| |
The removal of a bonded window is described using the
Removal kit for flush bonded windows -V.A.G 1474 A-. |
| |
Alternatively, you can also use the cutting tool for bonded
windows -VAS 6452-. |
| |
Another alternative is to use the window removal set -VAS
6888-. |
| Special tools and workshop equipment
required |
| |
Removal kit for flush bonded windows -V.A.G 1474 A- or
Removal kit for flush bonded windows -VAS 6452- |
| |
Suction lifter -V.A.G 1344- |
| |
Cutting tool -V.A.G 1351- |
| |
Windscreen removal kit -V.A.G 1755- |
| |
Cartridge gun -V.A.G 1628- |
|
|
|
|
|
|
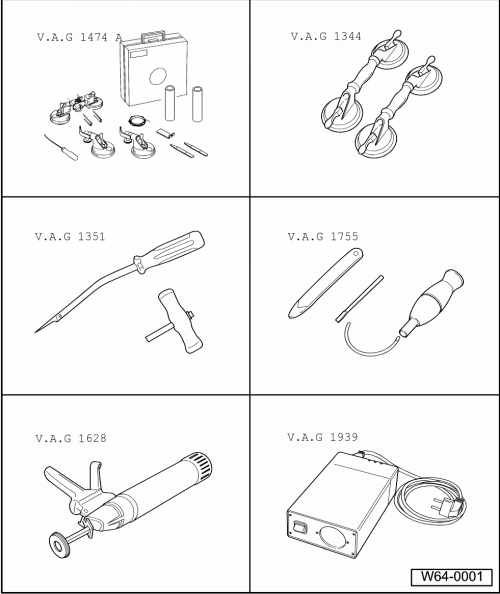
Cartridge heater -V.A.G 1939- |
Note
| If the rear window is reused, make sure that the electrical
connections for the rear window heating are not damaged. |
| – |
If the vehicle is equipped with a roof spoiler or a side spoiler on
the rear window, the spoilers must be removed first. |
| – |
Remove roof spoiler
→ Chapter; remove side spoilers
→ Chapter. |
| – |
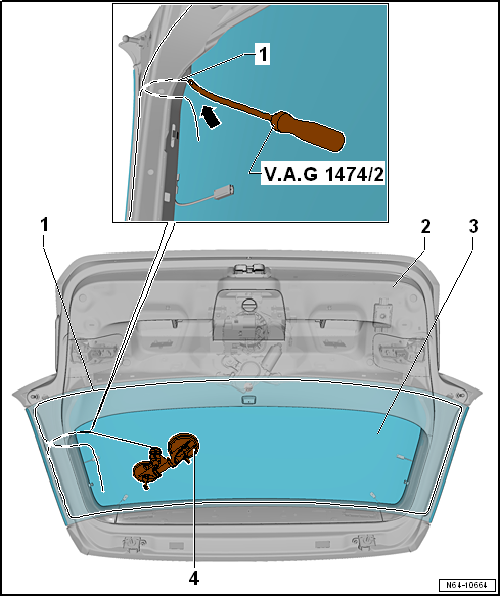
Pull off connectors for rear window heating and window aerial. |
| – |
Using the awl -V.A.G 1474/2- pull cutting cord
-1- through the adhesive sealant inwards at the location
-arrow- shown in the illustration. |
| – |
Secure end of cutting cord using pull handle -V.A.G 1351/1- to
prevent it from falling out. |
| – |
Lay cutting cord around rear window and guide second end of cord
inwards. |
| – |
Attach the end of the cutting cord on the removal kit for flush
bonded windows -VAS 6452- or the reel device -V.A.G 1654 A-. |
Note
| It is essential to use the protective film or the plastic strip -V.A.G
1474/15- in order to protect the metal flange. |
| – |
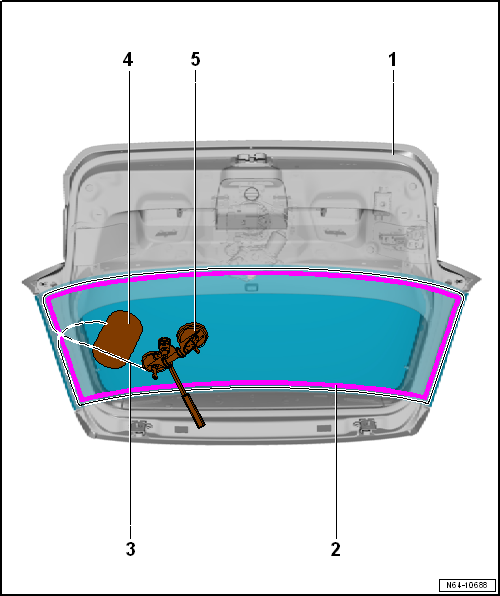
Carefully guide protective film -4- or
plastic strip -V.A.G 1474/15- between rear window and metal flange. |
| – |
Place reel device -V.A.G 1654 A- in indicated position. |
| – |
Turn reel device -V.A.G 1654 A- accordingly and cut rear window free
towards sides starting in upper area. |
| – |
Use wedge -V.A.G 1474/5- to press cutting cord
-3- against rear window glass while cutting in order to have
clearance at body flange. |
| – |
Then cut rear window free in lower area. |
| – |
Hold rear window on 2 suction lifters while cutting free.
|
 Caution Caution
| In the lower area of the rear window greater force may need
to be applied, since 2 adhesive beads must be cut. |
|
| – |
Pull rear window off rear lid using the 2 suction lifters. |
| – |
Preparing old undamaged window for glazing
→ Chapter. |
| – |
Preparing new window for glazing
→ Chapter. |
| – |
Preparing body flange for glazing
→ Chapter. |
| – |
Installation instructions
→ Chapter |
| – |
Minimum curing period
→ Chapter |
| – |
Install roof spoiler
→ Chapter; install new side spoilers
→ Chapter. |
|
|
|
Questions & answers
Removing and installing rear window — Volkswagen Golf Mk7
How is the Golf Mk7 rear window removed?
The same cutting method as the windscreen. Additionally, disconnect the heating element and aerial connections before lifting the glass.
Do I need to disconnect the Golf Mk7 rear window heating before removal?
Yes. Pull off the connections for the heated element and the aerial before cutting the adhesive and removing the glass.
1 -
Rear window
Removing and installing
→ Chapter
2 -
PUR adhesive sealant
Cross section of bead: -width b- = 7 ...
–
Protect body and interior from glass splinters.
–
Remove pieces of glass up to adhesive sealing material.
–&nbs ...


