 Note Note
| Certain repairs on vehicles require the removal of the
subframe or the entire front axle. |
| The original position of the subframe relative to the body
can be retained with the aid of qty. 4 locating pins -T10486/1-. |
| Qty. 2 locating pins -T10486/1- are a part of locating
device -T10486-. When locating device -T10486- is already being
employed, then only the addition of qty. 2 locating pins
-T10486/1- are required. |
| If the locating device -T10486- is not being employed, then
use locating device -T10486 A-. This contains qty. 4 locating
pins -T10486/1- and qty. 2 locating pins -T10486/2-. The
locating pins -T10486/2- are not required for the following
process. |
|
|
|
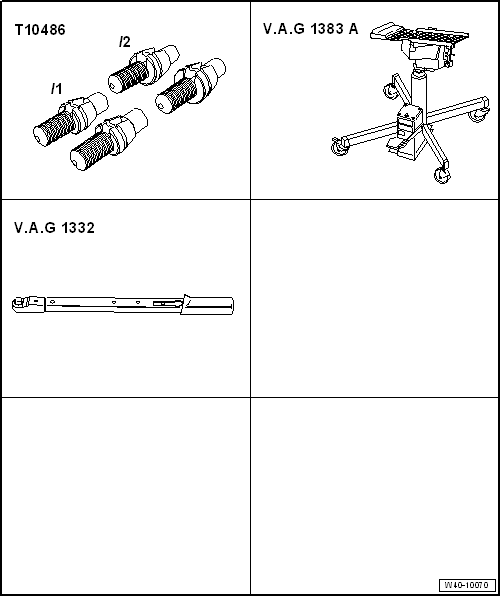
| Special tools and workshop equipment required |
| Qty. 4 locating pins -T10486/1- |
| Engine and gearbox jack -V.A.G 1383 A- with gearbox support -V.A.G
1359/2-. |
| Torque wrench -V.A.G 1332- |
| – |
De-energise high-voltage system
→ Rep. gr.93. |
| Continuation for all vehicles |
| – |
If fitted, remove front and rear noise insulation
→ General body repairs, exterior; Rep. gr.66. |
|
|
|
| – |
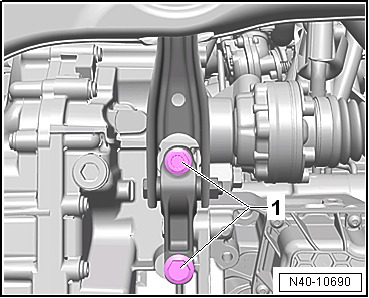
Unscrew bolts -1- for pendulum
support from gearbox. |
|
|
|
| – |
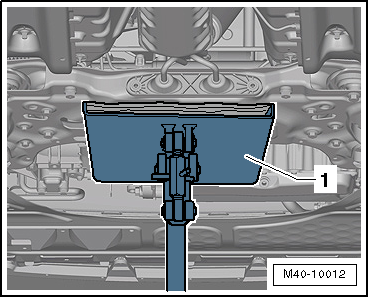
Position engine and gearbox jack -V.A.G 1383 A--1-
under subframe |
| – |
If necessary, clean thread of locating pins -T10486/1-. |
|
|
|
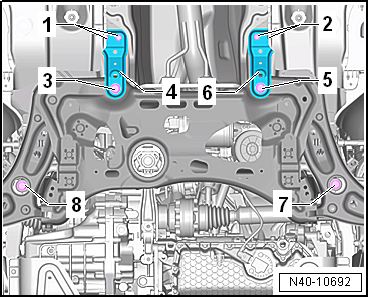
| To fix position of subframe, locating pins -T10486/1- must
be screwed one after the other into positions
-3-, -5-,
-7- and -8-. |
Note
| The locating pins -T10486/1- must NOT be tightened to more
than 20 Nm, otherwise the threads of the locating pin will be
damaged. |
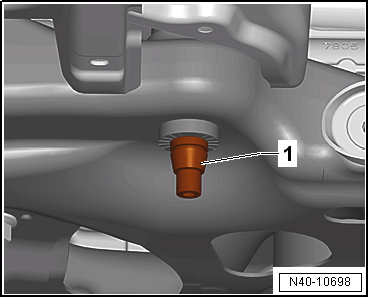
| Fixing position of subframe at rear |
|
|
|
| – |
Unscrew bolt -3-, and remove
support -4-. |
|
|
|
| – |
Insert locating pins -T10486/1--1-
and tighten to 20 Nm. |
|
|
|
| – |
Unscrew bolt -5-, and remove
support -6-. |
| – |
Insert locating pins -T10486/1- and tighten to 20 Nm. |
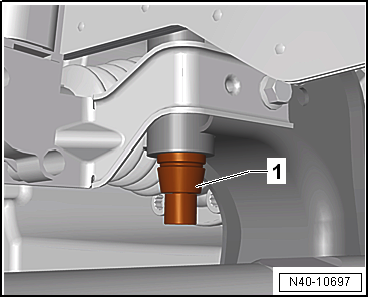
| Fixing position of subframe at front |
|
|
|
| – |
Insert locating pins -T10486/1--1-
and tighten to 20 Nm. |
|
|
|
| – |
Insert locating pins -T10486/1- and tighten to 20 Nm. |
| The fixing of the subframe is completed when all the above
mentioned bolts have been replaced consecutively with the
locating pins -T10486/1-. |
| The position of the subframe is now fixed. |
| Removing locating pins -T10486/1- |
| Remove in reverse order, observing the following: |
| – |
Always only unscrew one locating pin at a time and replace
it with a new bolt. |
| – |
On vehicles with vehicle level sender, carry out basic
settings for wheel damper electronics → Vehicle
diagnostic tester. |
| → Chapter „Assembly overview - subframe“ |
| Bolts for pendulum support, except for e-Golf
→ Rep. gr.10 |
| Bolts for pendulum support, e-Golf
→ Electrical system; Rep. gr.93 |
| Bolts for noise insulation
→ General body repairs, exterior; Rep. gr.66. |
| If a crooked steering wheel is determined during the road
test even though locating pins -T10486/1- were used, check wheel
alignment. In this case the wheel alignment test results must be
archived in the vehicle files. |
|
|
|
Questions & answers
Fixing position of subframe — Volkswagen Golf Mk7
How do I fix the Golf Mk7 subframe position after installation?
Use the alignment marks on the subframe and body. Adjust position before final torquing. Check wheel alignment afterwards.
Special tools and workshop equipment
required
Torque wrench -V.A.G 1332-
Removin ...


