| Heater and air conditioning system with electric/manual
controls |
| Special tools and workshop equipment
required |
| Vehicle diagnostic tester |
 Note Note
| The control motor has end stops with integrated limit
switches instead of a potentiometer. |
| First carry out the following work: |
| – |
Switch off all electrical consumers. |
| – |
Remove dash panel central tube
→ General body repairs, interior; Rep. gr.70. |
|
|
|
| – |
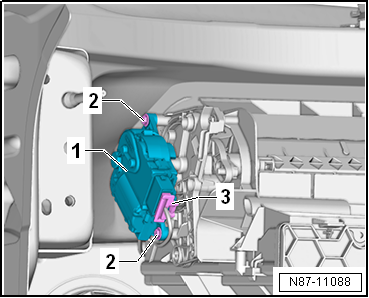
Remove air recirculation flap control motor -V113--1-
from air intake duct. |
| – |
Disconnect electrical connector -3-. |
|
|
|
| Installation is carried out in the reverse order. When
installing, note the following: |
Note
| Check operation of flaps and hinge mechanism before fitting. |
| Make sure levers and shafts are properly fitted in the
mounts. |
| – |
Fresh air flap must be set to “open” position, in order to
allow fresh air to flow into the vehicle. |
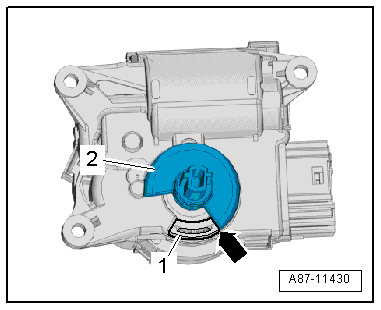
| The operating shaft -2- must be
on the stop -1--arrow- as shown. |
Note
| If the control motor operating shaft is not on the “fresh
air mode” stop, rotate the receptacle in the control motor. |
| – |
Switch on ignition, connect respective control motor to
vehicle wiring harness and select a setting on operating and
display unit to set control motor to desired position (e.g.
mid-position). Wait until control motor has moved to desired
position and switch off ignition. |
| – |
Position the control motor on the air intake box. The
operating shaft must engage in the receptacle. |
| There must not be any play in the connection between the
operating shaft and receptacle. |
Note
| If the bolts cannot be fitted, the control motor is not
completely seated on the housing. |
| – |
Route wiring harness so that it cannot come into contact
with any moving parts (e.g. actuating arm on control motor). |
| – |
Read event memory, and clear any entries displayed. Then,
perform “basic setting”vehicle diagnostic tester in “Guided
fault finding” mode. |
| – |
As a final step, check operation of heater and air
conditioning system. |
| → Chapter „Assembly overview - heater and air conditioning unit“ |
| Assembly overview - dash panel central tube
→ General body repairs, interior; Rep. gr.70. |
| Assembly overview - dash panel
→ General body repairs, interior; Rep. gr.70. |
|
|
|
Questions & answers
Removing and installing air recirculation flap control motor -V113-, RHD vehicles — Volkswagen Golf Mk7
How does Golf Mk7 -V113- removal differ on RHD?
Mirrored access from the passenger footwell area.
Heater and air conditioning system with electric/manual
controls
Special tools and workshop equipment
required
Veh ...
Special tools and workshop equipment
required
Vehicle diagnostic tester
First carry out the following work:
...

 Removing and installing air recirculation flap control motor -V113-, LHD
vehicles
Removing and installing air recirculation flap control motor -V113-, LHD
vehicles Removing and installing left temperature flap control motor -V158-, LHD
vehicles
Removing and installing left temperature flap control motor -V158-, LHD
vehicles