 Note
Note
- Only the left side is shown. The right side is similar
- After renewal of A-pillar, the specified torque for bolts
-2 and 5- as well as for
-14 and 17- changes
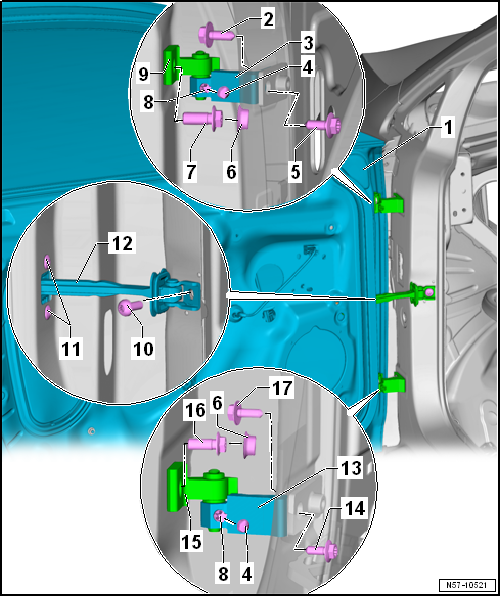
- Removing and installing
→ Chapter
- Adjusting
→ Chapter
- Loosening once to adjust door is allowed, afterwards renew always
- 50 Nm
Note
- After renewal of A-pillar the specified torque changes
- Specified torque after renewal of A-pillar: 20 Nm + 90°
- The hinge is split. Its upper and lower sections can be renewed
individually, if necessary
- Lower part is secured to hinge upper part with bolt
-8-
- For bolt -8-
- Not installed in all markets
- Installed from inside vehicle
- Loosening once to adjust door is allowed, afterwards renew always.
- For loosening and reattaching, the dash panel is not removed.
- To remove and install, the dash panel must be removed
→ General body repairs, interior; Rep. gr.70.
- 50 Nm
Note
- After renewal of A-pillar the specified torque changes.
- Specified torque after renewal of A-pillar: 20 Nm + 90°
- For bolts -7 and 16-
- Not installed in all markets
- Loosening once to adjust door is allowed, afterwards renew always.
- 50 Nm
- Connects upper part of hinge -3- to
bottom part of hinge -6-
- 23 Nm
- The hinge is split. Its upper and lower sections can be renewed
individually, if necessary.
- Upper part is secured to hinge lower part with bolt
-5-
- Removing and installing
→ Chapter
- The hinge is split. Its upper and lower sections can be renewed
individually, if necessary.
- Lower part is secured to hinge upper part with bolt
-8-
- Installed from inside vehicle
- Loosening once to adjust door is allowed, afterwards renew always.
- For removal and installation, A-pillar lower trim must be removed
→ General body repairs, interior; Rep. gr.70.
- 50 Nm
Note
- After renewal of A-pillar the specified torque changes
- Specified torque after renewal of A-pillar: 20 Nm + 90°
- The hinge is split. Its upper and lower sections can be renewed
individually, if necessary
- Upper part is secured to hinge lower part with bolt
-16-
- Loosening once to adjust door is allowed, afterwards renew always.
- 50 Nm
- Loosening once to adjust door is allowed, afterwards renew always.
- 50 Nm
Note
- After renewal of A-pillar the specified torque changes.
- Specified torque after renewal of A-pillar: 20 Nm + 90°
Questions & answers
Assembly overview - door — Volkswagen Golf Mk7
What does the Golf Mk7 front door assembly overview show?
The door, hinge bolts, bonded nut plates, check strap, striker pin, inner seal and all torque values. It notes that bolt torques change after A-pillar renewal.
Do Golf Mk7 door bolt torques change after body repair?
Yes. After renewal of the A-pillar, the specified torques for certain hinge and striker bolts change from the original values. The assembly overview lists both.
During production, a sealant is applied to the door inner
seals, which are then placed on the door flange and rolled on.
Note
When removing ...


